

AWS IoT Core
AWS IoT Core is an Amazon Web Service that enables connected devices to securely interact with cloud applications and other devices. AWS IoT Core can support many devices and messages, and it can process and route those messages to AWS IoT endpoints and other devices.
This Article is for Python Devs who are new to AWS IoT Core. Here I will be sharing an experimental version, How we can use AWS IoT Core for Authentication, Send messages to AWS IoT Core via MQTT and save that messages to Database through AWS Lambda and Django.
Points to Note:
I will be using Django and Postgres to store data, To set up the Project, You can refer previous blog link:
build-django-rest-project-in-dockerI'm not using any IoT Device for this experiment, will be using the system terminal.
Steps:
Register a Device
Publish an MQTT Message
Manage the Message
Store to the DataBase
Prerequisite:
AWS Account (free tier is enough)
Python version 3+
Pip
PyCharm (or any other IDE support Python)
Register a Device
Login to the AWS Account and search IoT Core or open the link IoT Core. In the Left Nav Bar, Under Manage -> All Devices, Click "Things". A list view page will display, In that click "Create things" and follow:
I'm Considering a single device only so, Select "Create single thing" and click "Next".
Type a Thing name following the conditions. eg: demo_thing
all others are optional and click "Next"Here we need to decide on the device certification, which will be later for authentication.
Select "Auto-generate a new certificate (recommended)", and AWS IoT Certificate Authority will create a certificate for the device. and click "Next".The next section will be "Attach policies to certificate", We need to create a certificate policy to attach the policy. So click "Create policy"
I will be creating an allow any with a full permission policy (not recommended). After the Successful implementation, we can change as per our requirements
Type a Policy name. eg: demoPolicy
Under the Policy Document section:
Policy Effect- Allow
Policy action- *
Policy Resource- *
Create
Back to Attach policies to certificate Section: refresh the list and select the "demoPolicy".
Click Create thing.Here We need to download all the certificates, keys and pem files and Click "Done".
Publish an MQTT Message
In the Left Nav, Under Test, Click "MQTT test client"
Under the "Subscribe to a topic" Section:
Type a Topic Filter. eg: demo/output and Click "Subcribe"
Under the "Publish to a topic" Section:
Type Topic name. eg: demo/output
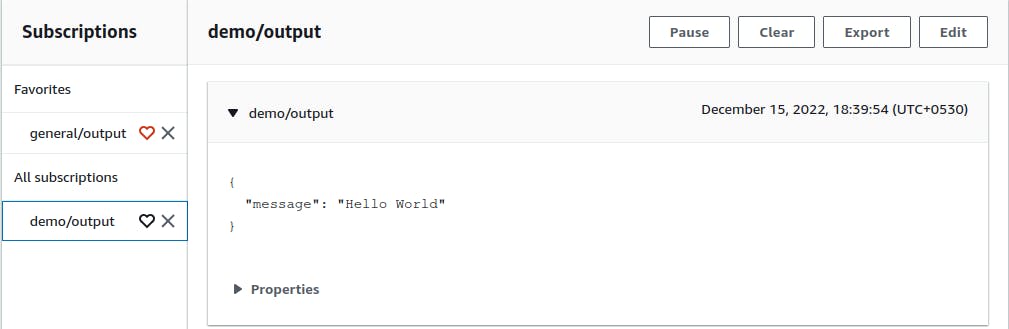
Message payload:{ "message": "Hello from AWS IoT console" }Click "Publish"
On the Subscriptions Section, The above Payload message will be displayed, Note: Just to confirm that the topic is ready.
Now copy all the downloaded files to a directory and create a python file "publish.py"
Copy the code:
from awscrt import io, mqtt, auth, http
from awsiot import mqtt_connection_builder
import time as t
import json

ENDPOINT = "abcdefghij-abs.iot.us-west-2.amazonaws.com"
CLIENT_ID = "demo_thing"
PATH_TO_CERTIFICATE = "/home/prasanthsebastian/demo/AWS_IOT/97ef9baa3cd2fxxxxxxxxxxxxxxxxxxxxxxxxxx-certificate.pem.crt"
PATH_TO_PRIVATE_KEY = "/home/prasanthsebastian/demo/AWS_IOT/97ef9baa3cd2fxxxxxxxxxxxxxxxxxxxxxxxxxx-private.pem.key"
PATH_TO_AMAZON_ROOT_CA_1 = "/home/prasanthsebastian/demo/AWS_IOT/AmazonRootCA1.pem"
MESSAGE = "Hello World"
TOPIC = "demo/output"

# Setting up the resource
event_loop_group = io.EventLoopGroup(1)
host_resolver = io.DefaultHostResolver(event_loop_group)
client_bootstrap = io.ClientBootstrap(event_loop_group, host_resolver)
mqtt_connection = mqtt_connection_builder.mtls_from_path(
    endpoint=ENDPOINT,
    cert_filepath=PATH_TO_CERTIFICATE,
    pri_key_filepath=PATH_TO_PRIVATE_KEY,
    client_bootstrap=client_bootstrap,
    ca_filepath=PATH_TO_AMAZON_ROOT_CA_1,
    client_id=CLIENT_ID,
    clean_session=False,
    keep_alive_secs=6
)
# Establishing the connection
connect_future = mqtt_connection.connect()
connect_future.result()
print("Connected!")
# Publish message.
data = "{}".format(MESSAGE)
message = {"message": data}
mqtt_connection.publish(topic=TOPIC, payload=json.dumps(message), qos=mqtt.QoS.AT_LEAST_ONCE)
print("Published: '" + json.dumps(message) + "' to the topic: " + TOPIC)
t.sleep(0.1)
print('Publish End')
# Closing the Connection
disconnect_future = mqtt_connection.disconnect()
disconnect_future.result()
print("Disconnected...")
Now, Open the created folder in PyCharm IDE. Open the Terminal window from the bottom of the Application or click Alt+F12 (shortcut).
In the Terminal type: virtualenv venv
A folder named "venv" will be installed and following some python packages will be installed in the folder. Here we installed the virtual environment for the project.
Let's Activate the Environment by executing the command: . venv/bin/activate

By this time, we can see (venv) is appended in the cursor. It's a way to identify its current environment.
Now Install the required python package: pip install awsiotsdk
After installation runs the file: python publish.py

The Above displayed messages will be displayed if all went well.
Note: All the credentials and Topic need to be correct.
The sent message can be viewed on the AWS IoT Core -> Subscriptions Section.
Manage the message
Now that the sent message from the device will reach the IoT Core, So next we need to manage the message IoT Core received.
For that, I'm gonna create a "Rule" to execute when IoT Core receives an MQTT message.
In the Left Nav, Under "Message Routing" Click "Rules":
Click on the "Create rule"
Type a Rule name. eg: demo_rule and then click "Next"
In the "SQL Statement" section copy:
SELECT * FROM demo/outputClick "Next"
Now we need to add the action for the rule, I'm gonna use the Lambda. There are other alternate options, Use them at your convenience.
On selecting lambda we need to select an existing lambda function or creating a new one. So, I'm Creating a new Lambda function. For that follow the steps:
-> Under Create function, Choose "Auther from scratch"
-> Type function "demoFunction".
-> Select Runtime as "Python 3.9" or higher (for future).
-> Select Architecture as "x86_64".
-> Click Create function.Now that the Lambda function is created. Copy the code to lambda_function.py in the Code section.
import json
import requests

def lambda_handler(event, context):
    paylod = {
    'message': event["message"]
    }
    url="https://6451-xxx-xxx-xxx-xxx.in.ngrok.io/device/device-message/"
    payload = json.dumps(paylod)
    headers = {
    'Content-Type': 'application/json',
    'Accept': 'application/json'
    }
    response = requests.request("POST", url, headers=headers, data=payload)
Here, The Lambda function will start execution by the trigger from AWS IoT Core, The "event" will contain the message from the topic "demo/output". The function takes the message part from the event and sends a POST request to the Rest API URL.
I'm inserting a ngork URL which is tunneled to my Django project's localhost, which will accept the request and store it in the local Postgres DB.
Store to the DB
The initial setup and creation of the Django project are shared in my previous blog, Please refer: build-django-rest-project-in-docker.
So, I will be sharing part of the Project where the API accepts the request and store it into the DB.
Add this to the app's urls.py file:
path("device-message/", dev.DeviceLogViewTest.as_view()),
and in views.py:
from rest_framework.response import Response
from . import models as demomodel

class DeviceLogViewTest(APIView):
    """
        API used to store device log of device
    """
    def post(self,request):
        demomodel.device.create(message=request.data["message"])
        context = {}
        response = Response(context)
        response.data["message"] = "log added"
        return response
Conclusion
This is a demo of how we can use the AWS IoT Core, and how we can connect to a web application. There are other methods that I will be trying in the future and will share them as well.